環境
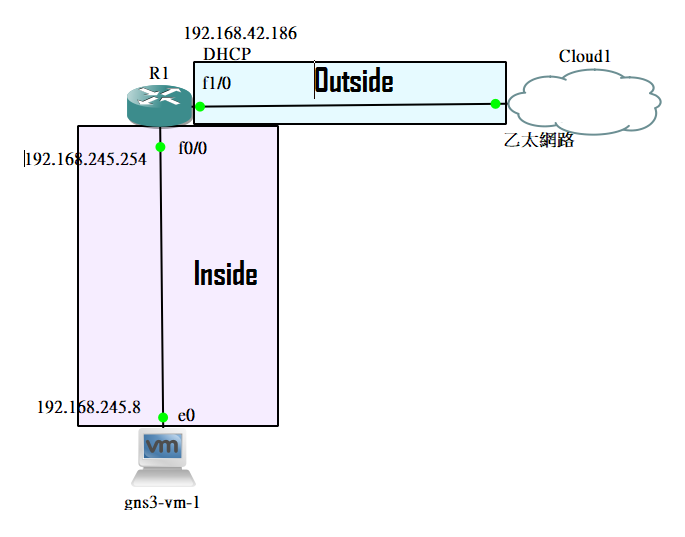
配置一台 host only 的虛擬機和一台 R1 路由器以及可以連至網際網路的 Cloud1。該 Cloud1 使用的是手機 USB 出來的網路適配器。
配置 R1
配置 f0/0 的 IP,對於這個 f0/0 來說它是虛擬機的 gateway,只要封包不知道要往哪邊走都會網 f0/0 丟。
R1(config)#interface fastEthernet 0/0
R1(config-if)#ip address 192.168.245.254 255.255.255.0
R1(config-if)#no shutdown
配置 R1 的 Outside 接口,使用 DHCP 方式向 Cloud1 請求 IP。
R1(config)#interface fastEthernet 1/0
R1(config-if)#no shutdown
R1(config-if)#ip address dhcp
確認有無配置到 IP。
R1(config-if)#do sh ip int brief
Interface                  IP-Address      OK? Method Status                Protocol
FastEthernet0/0            192.168.245.254 YES manual up                    up
FastEthernet1/0            192.168.42.186  YES DHCP   up                    up
接著虛擬機嘗試 ping gateway 就是 f0/0 接口,要成功否則須檢查網路配置。再 ping f1/0 接口也是要通的,雖然不同網段但是是直連網路。如果 ping 8.8.8.8 是無法連接的,因為對虛擬機來說她不知道要把 8.8.8.8 這個的封包轉發到哪,因此它會丟向 R1 的 f0/0 接口,但 f0/0 接口也不知到要怎麼轉發所以導致無法成功的通訊,這邊就需配置 NAT。
同樣的先設置好,Inside 和 Outside 的接口,接著使用 ip nat 方式建立一個 static 的 NAT 對應表。ip nat inside source 指的是要使用Inside 內的主機 IP,static 表示建立靜態的 NAT,最後輸入 Inside 的 IP 和要對應的 Outside IP,這種方式和設定靜態路由很像,這邊的設定已經是指名去轉換,因此就不必要像動態 NAT 一樣去做一個 access-list。
R1(config)#int fastEthernet 0/0
R1(config-if)#ip nat inside
R1(config)#int fastEthernet 1/0
R1(config-if)#ip nat outside
R1(config)#ip nat inside source static 192.168.245.8 192.168.42.190
R1(config)#ip name-server 192.168.42.1
R1(config)#ip domain-lookup
我們在 R1 添加了一個靜態 NAT 後在虛擬機嘗試 ping 8.8.8.8,這次因為透過 NAT 轉換而請求成功,如下圖

驗證
查看 NAT 過程,這部分在動態的 NAT 說明過。
R1#show ip nat translations
Pro Inside global      Inside local       Outside local      Outside global
tcp 192.168.42.190:34100 192.168.245.8:34100 204.79.197.200:80 204.79.197.200:80
tcp 192.168.42.190:52330 192.168.245.8:52330 8.8.8.8:80      8.8.8.8:80
--- 192.168.42.190     192.168.245.8      ---                ---